
Making a background to complement the papers
I love to make colored background on white cardstock to give my pages a little more texture and color and I will show you a few steps of my creative process.
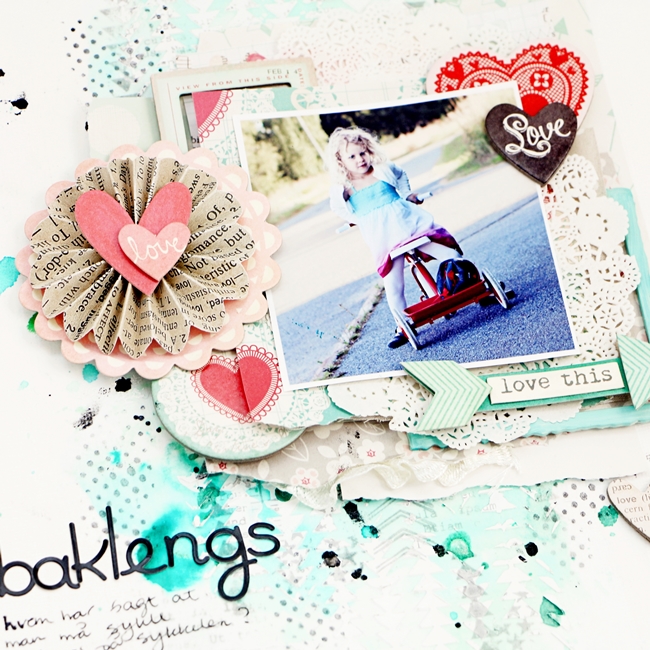
First finished layout

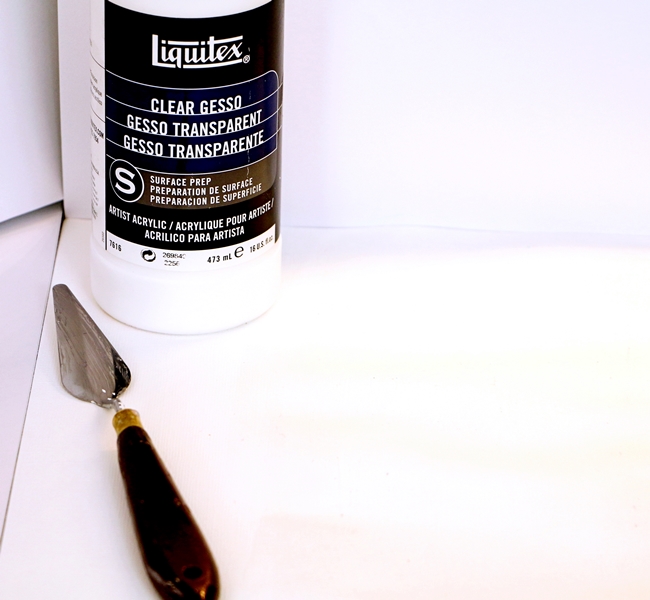
I start up with white cardstock and some clear gesso. You might ask why clear gesso and not just regular white gesso and the answer is that the white gesso looks a little yellow on white cardstock and that the clear gesso absorbs the colors of mist more than it deflects it like with white gesso. While gesso gesso feels kind of smooth on you page, the clear gesso feels much rougher.
Don't worry that your page gets a little wobbly by the gesso, water and mist, think more about the fun you have playing with different techniques instead. I mixed mist with water and water with Peerless Transparent Watercolors - a paper with colors together with a brush. Use paper or babywipe to remove some excess color or water and to get different shades of the same color. Drop some mist and you will see the mist spread like when water freezes.
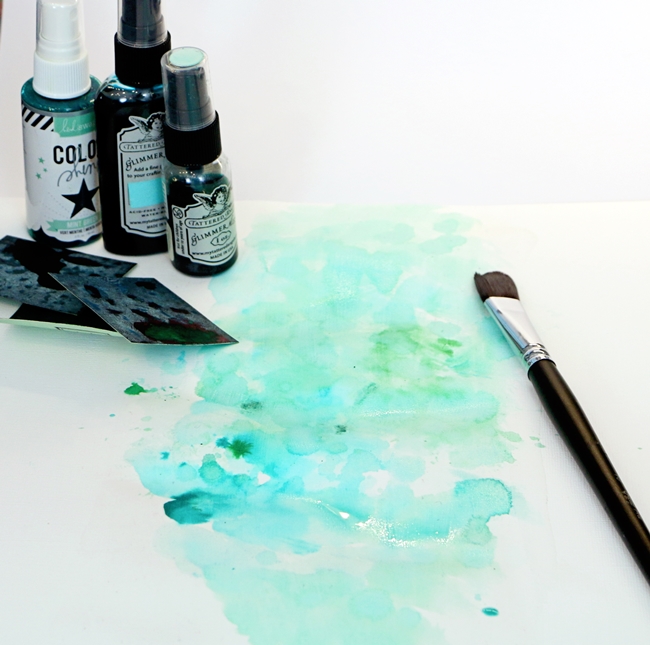
Spray some water to get more shades of color. (A fun thing here is to use salt - so feel free to try different things to get the mix of shades)

After the first layers of colors dried I dropped more mists on the page. Then I used a stencils and smeared heavy gesso on to give it some texture and soften the blue/green tones. Then I stamped with a grey stamp pad all over the colored areas.


Then I cut the papers in pieces, crunched them a little to give them a little more texture and stapled them together and decorated with some chipboard and dimensional stickers. Finished layout.
I hope you get a little inspired to play with colors by this little tutorial.
While you're on the website, we hope you'll take a few moments to soak up the amazing inspiration in our design team gallery.
For more of my tutorials go here
Here you can see my first video making the same kind of background.
This is an amazing layout, and it's great to see how you created the beautiful background! Thanks for sharing!
ReplyDeleteThank you Christin! In Poland it's hard to get clear gesso, but a week ago I bought the same as You used! I had no time to use it, but I see that it will just perfect for LOs - I really love the way You show backgrounds! Great project!
ReplyDeleteGreat little tutorial Christen. TFS. Cheers Di
ReplyDeleteTack så väldigt mycket för detta och för din enorma inspiration! Nu ska jag försöka igen!
ReplyDeleteHello from Canada - I've been admiring your pages for a long time, very excited to see how you make those gorgeous backgrounds - thanks for sharing!!!
ReplyDeleteThank you so much for sharing your technique...I have loved your work for a long time. You make Beautiful work, thank you again for sharing with us. All the best from Montana, USA
ReplyDeleteNydelig som alltid, Christin! ♥
ReplyDeleteGøy å se teknikkene dine, og prosessen din :)
Lovely background page. TFS
ReplyDeleteSo inspiring, thank you!
ReplyDeletetrès belle page j'aime ces dégradés de bleu
ReplyDeleteSuperbe ta page bises pretty
ReplyDeleteThis is gorgeous and I love the pop of red. I thought maybe I bought the wrong thing with the clear gesso. Nice to know it is supposed to be rougher. I also hate that the white looks yellow on white paper. Thanks for the tips going to give it a try.
ReplyDelete